![]()
![]()
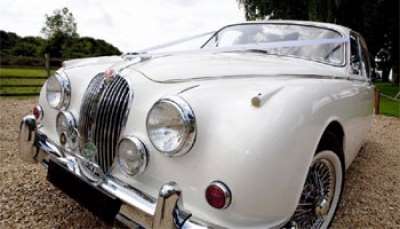
Youngest son's hood lining in his XJ6 Series 3 was pretty bad. Previous owners had injected contact cement to hold the hood lining up but it looked awful and as it turned out the "card" i.e. the backing piece for the hood lining was quite damaged anyway.
After some months we finally got the tip off that someone in Beenleigh was wrecking a series 3 with a good hood lining. I ripped down there in the Falcon Ute one Saturday morning and the hood-lining card was as good as described. The deal was struck and I also picked up a dash panel upper that was not cracked/crazed etc for a reasonable price.
My son was more than happy that he now had two items which he had been chasing for some time but stated the colour of the cover on then hood lining was not "right". Hr then hived off to Daley's motor trim supplies at Rocklea just immediately south of Archerfield on the road into the speedway and secured enough material of his desired choice for about $60.00.
A couple of cans of spray pack contact later the hood liner was now finished in the right colour and ready to mount. The whole thing then spent some weeks sitting ion top of my MK 2 while he raced all over the country playing in his band.
He then approached me to remove the Series 3 front windscreen to allow the hood liner to be inserted. I refused and let me tell you readers do not fall for the trap of removing front windscreens from Series 3 Jags. They are actually glued into the body and I have spent an hour cutting the thing out of the car by use of a fine piano wire cutter. Leave it to the professionals who typically charge about $40 to $50 to do the job.
With only a moderate amount of bending the new hood liner can be inserted through the left hand rear door provided the rear seats are removed as well as the front left hand passenger seat with the right hand seatback laid flat. This also applies to series 2 XJ 6 vehicles provided they are the "L" series with then longer wheelbase. Get a tape measure and check for the widest part of the opening.
The hood lining was inserted and lifted into the supports and definitely looks much better than the original grungy mess. However youngest son has still not finished the job of putting back the seats that are cluttering up one end of the shed.
While in Adelaide I had a plaintive phone call from youngest son that his Series3 XJ6 had simply stopped on the road and he had to have it towed home. We stated a long-range diagnosis by phone. Put the car into drive and turn to start. Does the fuel pump run? "Yes" says he. Pull the coil lead from the distributor and check for spark. Is there any? "Yes" says he. Disconnect a fuel injector hose from the fuel rail and run the fuel pump in start with the car in drive to see if any fuel comes out. "No fuel" says he. Check the fuel filter can you blow through it? "No" says he. Replace fuel filter with a new one and try again. "Didn't work," says he. All this took a number of phone calls over several days. Finally I said, "I will be home in a few days so hang off until then".
The upshot was that although the fuel pump ran there was no pressure. The pump was opened up and it was found that the pump section had seized but a shear pin system allowed the motor to still run. Another pump was obtained and the car started immediately. So don't be fooled by a fuel injection pump, which sounds to be running OK. Disconnect the fuel line at the outlet and check that there is flow and pressure.
A fellow club member who regularly drops in to my place had been having some trouble with a series 3 XJ6 blowing head gaskets. He eventually checked the engine block and found the typical warp which in this case was about 9 thousandths of an inch [.009]
He finally bit the bullet and removed the engine for some serious machining work to get the engine block re-decked i.e. ground back to get rid of the warp. . Along with that he had a typical problem with a broken head stud when he removed the said studs for the machining work. He requested the workshop carrying out the machining to extract the broken stud.
He was put onto an alert by the workshop that he should also check the length of the old head studs as they do have a history of stretching. When he did this he found that they had in fact stretched. This may not sound serious but it is a problem in that Jaguar use a domed [acorn] nut to hold down the head.
If the stud has stretched the nut may feel as if has tightened down onto the head but it may have only tightened down onto the stud and may be exerting little or no pressure onto the head. This is a condition known as becoming “thread bound”. I.e. the nut is tight on the thread but is not holding the parts together with sufficient pressure.
Upon checking the head studs he found that they had all stretched beyond limits and a new set of studs was definitely needed. The XJ workshop manual does give guidance on checking the stud length but how many of us amateur mechanics read the manual before tackling the job?
In fact one wonders if the stretched head studs were not the problem in the first place as the engine had not really done any serious distance since an “overhaul” by a previous owner
In discussion with this member who like myself has lived in remote areas we agreed that if we struck this stretched stud problem well away from any reasonable engineering facilities we would either add an extra washer onto the head and use the Jaguar acorn nut or ditch the acorn nut and use common plain nuts. That would at least allow us some chance of carrying out a repair sufficient to get us home.
Readers might remember an issue a couple of years ago when my subject topic was a replacement fuel pump for the SU pump fitted to the early model (pre fuel injected) cars. I proposed at the time to trial the "electronic" pump in one of my cars. I installed it in my MK 1 3.4 auto as the SU pump in that car had been a real source of trouble in spite of a complete overhaul.
The electronic pump has been very reliable and has not caused any problems whatsoever. My only remark is because it is not mounted on any noise insulation it is noisy prior to engine start. Once the engine is running you do not hear the pump. Don't forget that the SU pump is normally mounted on noise insulating rubbers. I believe if I devised a noise insulating mounting there would not be much difference between the two types.
In the meantime I have discovered that there is an electric low pressure [3 pounds per square inch {psi}] rotary fuel pump on the market that is designed for carburettor cars. Electric rotary fuel pumps are normally used by fuel injected cars such as the Series 3 XJ6 and your current model Ford Falcon and Holden Commodore. However these pumps are very high pressure [typically around 30 psi] and unsuitable for carburettor vehicles as the float valve to control fuel level in the carby cannot handle the pressure. The pump is "Carter" brand made in the USA however AKSES who advertise in this magazine advise that they are having difficulty getting stock at the moment.
This modification is done to take advantage of the larger (1-7/8” ) inlet valves on the later cylinder head, although the earlier heads can also be modified to accept the larger valves. Issues which need to be addressed are as follows:
1. The inlet manifold on 3.8 litre motors differs from the 4.2 litre manifold. This article assumes you have the 4.2 litre inlet manifold.
2. The later cylinder head has extra holes for coolant flow between the block and the head. The two rear holes have to be welded closed. Any cylinder head reconditioner should be able to do this.
3. The later cylinder head casting is more upright at the front. Therefore, if you are using the earlier polished cam covers you will notice that the machined mating surfaces on the later head extend about 5 mm forward of your polished cam covers. Fortunately, if this offends your æsthetic sensibilities (as it does mine), there is enough metal to permit filing back in a nice radius followed by polishing. The fit of your early cam covers will then look just as it should.
4. You will also find reduced clearance or interference between the U-shaped aluminium breather and the cylinder head. You’ll have to take a file to the rear of the breather in the appropriate places.
5. If you want to retain your old tachometer generator, you’ll need to drill and tap three holes for it on the inlet side. Similarly for the camshaft blanking plug on the exhaust side you’ll need to drill and tap two holes.
6. Keeping the tacho’ generator means you’ll have to retain the old style camshaft covers, but for aesthetic reasons you’d probably want to keep these anyway.
7. The rear inlet camshaft bearing cap on the earlier head is longer than its later counterpart. It extends rearward out through a machined half circle in the polished cam cover, whereas the later shorter bearing cap does not. (This is because the later cam cover is not machined to accept the tacho’ generator.) The old bearing cap can’t be swapped onto the Series 3 head because it won’t mate correctly with the head. Therefore the half annular gap between the polished cam cover and the tacho’ drive has to be filled. The easiest way to do this is to cut the end off an unwanted early bearing cap. Alternatively, you will have to get an appropriately dimensioned ring turned up in a lathe, cut approximately in half and filed to accurate size.
8. If you don’t want the original tacho’ generator, but do want the old style polished cam covers you’ll have to arrange for an aluminium plug to be turned up.
 Reluctant sale of my 1977 Jaguar XJS due to my mobility. Over the past 5 years I have replaced the following: Brakes all round Original wheels with Chrome Wire Wheels and new tyres Radiator, engine oil and automatic transmission coolers Water pump and power steering cooler All belts and hoses Windscreen Air conditioner compressor, hoses, TX valve and condenser. Complete new interior (front and rear seats, centre console, carpets, headlining) Body and paint is tidy. Registered until 5 March 2027 so can be road tested. Note: the vehicle is being sold without a Safety Certificate. It needs work to the…
  FOR SALE - 2006 Litre Luxury Jaguar X Type Beautiful champagne Duco Premium Jaguar 3 Litre automatic vehicle in pristine condition with only 159,000 km on the clock The car has Top quality finishes with beige leather upholstery and classic Jaguar walnut woodgrain internal finishes. The vehicle has been singularly owned since new and has been serviced by Jaguar mechanics from date of original purchase, it drives perfectly and has been meticulously cared for by me as a keen Jaguar enthusiast. I have all the service records and original Manuals, the car will delight any enthusiast as its new owner.…
  1949 MK V 3.5L Good running car. Excellent interior Price: $28,000 Tonny 0418 191 700
 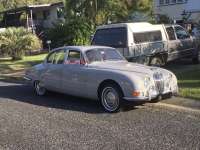 1964 S Type. 3.4 Auto. Good all round, rust free. Price: $16,000 Tonny 0418 191 700
  Ezi Bleed kit for the rear brakes on IRS cars. Makes bleeding of the inboard rear brakes by effectively moving the bleed nipples to much more accessible locations. Unused still in the packet. Price: $120 Heat shields Left and Right for the firewall of a V12 E Type. Brand new.. Price: $120 for both Located in Redcliffe. Prices are negotiable .
 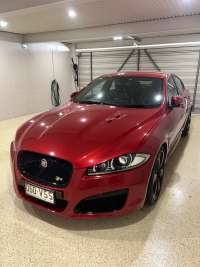 This is one of only 10 XFR/XFRS models imported to Australian by JLR in 2014/15. This rare vehicle has a 5.0 Supercharged V8 engine and has an impressive list of factory options over and above all the standard luxuries : XFR Dynamic pack Italian Racing Red Metallic Paint Dark mesh aluminium and carbon fibre trim 20” Varuna wheels Black pack Jet Hood lining 60/40 Split fold rear seat This one owner vehicle has done less than 75,000 klm, been garaged since new and maintained by a Jaguar specialist. It is beautiful to drive, understated in a lot of ways, comfortable,…
  The March-April 2026 Edition of Queensland Jaguar Driver Magazine is now online and available to members by logging on
| Mon May 25, 2026 @ 7:00PM - Gold Coast Monthly Meeting |
| Mon Jun 01, 2026 @10:00AM - BNE Register Coffee Catchup |
| Wed Jun 03, 2026 @12:00AM Cooly Rocks On |
| Thu Jun 04, 2026 @12:00AM Cooly Rocks On |
| Fri Jun 05, 2026 @12:00AM Cooly Rocks On |
| Sat Jun 06, 2026 @12:00AM Cooly Rocks On |
| Sun Jun 07, 2026 @12:00AM Cooly Rocks On |
| Sat Jun 13, 2026 @ 8:00AM - 05:00PM Weekend Away |
| Sat Jun 13, 2026 @ 8:00AM - 05:00PM Weekend Away |
| Sun Jun 14, 2026 @ 7:00AM - 03:00PM RACQ Motorfest |