Malcolm Sayer’s Intent Reinstated?

Malcolm Sayer’s C, and D-Type designs are wonderful examples of the design dictum that “form follows function”. However, in the case of the Series 1 E-Type, I feel that the beauty of its otherwise functional lines is marred by the addition of chrome plated finisher rings to the headlight apertures.
You can give your E-Type the smooth appearance of the C and D-Type Jaguars by fitting flush-mounted Perspex headlight covers. I like to imagine that this would have been Sayer’s original intent.
(The chrome rings look like something which the Marketing Department thought was necessary to appeal to the US market.)
The following actions are required (all work is reversible):
1. Remove the offending headlight finisher rings, glass covers and rubber gaskets.
2. Remove the chrome beading from between the mudguards and the bonnet centre section. (With the finisher rings removed, all four beads are too short.)
3. Weld closed the holes for the screws which fastened the finisher rings to the bonnet (the captive nuts remain in place).
4. Prepare and repaint the bonnet.
5. Make the moulds on which the Perspex headlight covers will be formed. These are moulded on the original glass headlight covers, but have to be enlarged because, without their rubber seals, the glasses are smaller than the recesses in the bonnet. I made male moulds. Proceed as follows:
5.1 Grease the inside of the glass headlight covers and cover them with cling wrap.
5.2 With the concave side up, make a dam around the periphery of the headlight covers. I used a "ring" of flexible plastic strip wound around the covers and secured with duct tape.
5.3 Pour cement into mould. I used about 3:1 sand to cement and put some wires in the cement to reinforce it.
5.4 After the cement has set remove the mould from the glass headlight covers. Remove any cling wrap from mould.
5.5 The mould is smaller than the finished Perspex cover needs to be, so the perimeter of the mould is enlarged using body filler. Also any imperfections in the surface of the mould are corrected with body filler. The surface of the mould must be perfectly smooth.
6. Form the Perspex covers as follows from 2.8 or 3 mm thick Perspex:
6.1 The mould is placed on a brick on an oven tray.
6.2 Perspex, cut oversize, is placed on the raised mould. It is important to keep the amount of oversize to a minimum. The Perspex is supplied with a protective plastic film over it. This is left in place. A finely woven cotton cloth is also placed over the Perspex.
6.3 A fibreglass flywire is now placed over the cotton cover. This flywire hangs below the edge of the Perspex. (The function of the cotton cover is to prevent an impression of the flywire being left on the surface of the Perspex.)
6.4 Apply even downward force all around by hanging steel chain from wire hooks around the perimeter of the flywire. (The purpose of the brick mentioned at point 6.1 was to give clearance for the hanging chain.)
6.5 Place the oven tray in your home oven. Bring to 160ºC. (best done while spouse is absent). When the oven is up to temperature, the bending of the Perspex can be assisted by a gloved hand.
6.6 Leave the mould in the oven and allow it to cool slowly back to room temperature. Slow cooling is very important. Excessive distortion of the headlight cover will result if it is removed from the mould before it is absolutely cold.
6.7 Remove the Perspex cover from the mould.
6.8 Trim excess Perspex and shape the covers to fit the recesses in the headlight apertures. (The Perspex is cut and trimmed using an angle grinder.)
6.9 You will find that the headlight covers are not exactly the same shape as the moulds. They will bend down along their sides more than the original glass. (As the Perspex cools it pulls down onto the mould at its edges rather than shrinking away from the mould.) This is actually an advantage for the reason given at point 8.
7. As a gasket, apply self-adhesive closed cell neoprene foam strip to the recesses in the headlight apertures.
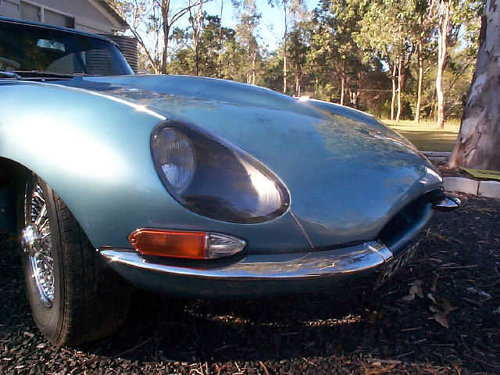
8. Drill the Perspex covers and the recess in the bonnet aperture to suit the self tapping screws which will retain the Perspex covers. Two size 6 self tapping screws is all that is needed. The greater curvature of the moulded Perspex than the original glass means that when secured front and rear on the main axis of curvature the sides will pull firmly down into the foam gasket. The sides will flex back to the required shape, and you will find that only two stainless steel self tapping screws are required for each cover. These can be seen in the accompanying photo.
9. Fasten the Perspex covers to the headlight apertures. (Use hard self tapping screws to cut the initial thread before inserting identical stainless steel screws.)
10. Purchase two long chrome bonnet beads (BD 19029/1).
11. Fit the new long chrome beads. (The beads are supplied longer than necessary and have to be cut to length.)
12. Use one of the previously removed long beads to make two short beads.
13. Fit the short beads to the bonnet.
14. It would be a nice touch to turn up a couple of stainless steel plugs to close off the leading edge of the long beads just above the headlights. I haven’t got around to doing this yet.
15. Over a period of time the Perspex tends to craze where it is in contact with the neoprene foam gasket. This appears to be promoted by the action of sunlight. To retard this crazing, the outside perimeter of the Perspex over the neoprene seal could be painted with a satin black paint. Again I haven’t done this yet. This will happen when I eventually make replacement covers.
The Result - This photo shows the two size 6 screws which hold the cover. The over-riders and motif bar have also been removed. But that's another story